I like to give my neighbors cookies and treats at Christmas, and usually I go buy little bags or boxes to use. But this year I tried to think of something I might have around the house besides paper plates, and I realized I just needed to start saving peanut butter jars, coffee containers, and formula tubs. I have a whole stack of them in my pantry to pretty up for giving away cookies this year. I did this one from a large peanut butter jar.
You'll need:
container of your choice with a lid
burlap
ribbon
sharp scissors
glue
Christmas paper
embroidery needle
ruler
tape measure
Start with a cleaned out container. If you use a coffee container, soak it for a while with a water/baking soda solution to rid it of the coffee smell/flavor. You could definitely use glass jars for this, too, like from salsa or pickles. Or if you don't know what to do with your 25 mason jars in your basement.
First, measure your jar from the middle of the bottom to just beyond the top of the lid. Here's my mom, helping out again.
My jar was 8 1/2 inches, so I wanted a 17" x 17" square of fabric. Measure and cut your square out.
You don't need to be super exact here. The charm lies in the rusticness of this project.
Now you'll want to cut the corners off of your square and do a rough circle shape.
Glue the bottom of your jar to the center of the burlap circle. I put wax paper underneath since burlap is very porous. And then you can peel off the wax paper after the glue is dry.
Press firmly and let it dry a few minutes. Now grab your embroidery needle and thread your ribbon through.
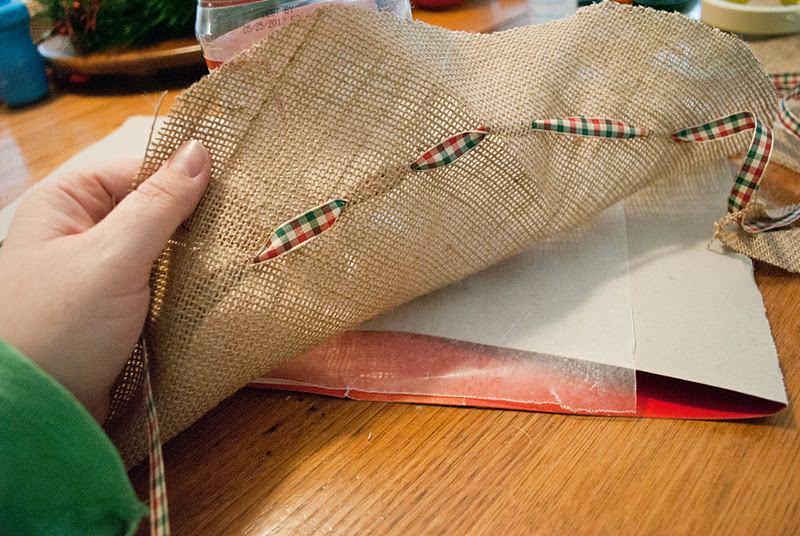
Sew around the edge of the circle, about 2 inches in. This ribbon will gather in at the neck of your bottle, so you may want to check how far in you want to be before you start. I didn't do an exact measurement, I just held it up for an idea of where it should be. I varied my stitch length so that the gathers weren't uniform. Feel free to be more precise if you feel compelled.
You can see above just how un-precise I can be. Now pull your ribbon through so that you have 2 tails coming out right next to each other.
Start pulling the ribbon tails so that the burlap starts to gather.
Pull as tightly as possible, and then tie a tight knot.
You can tie a bow here if you like what you see, but I wanted more ribbon showing overall, so I doubled the ribbon back over the stitched ribbon and tie a bow.
Now take off the lid, and find some pretty paper. You could also use wrapping paper.
Trace a circle around your lid.
Since my lid was red, I cut the circle to fit slightly inside. But you can cover the entire lid, and also use a ribbon around the edge if you don't like your lid. You can write a message on the lid, or stick on a To: From: label. Use glue to attach your paper circle to the lid.
Now fill up your jar with treats!
And now you have a pretty little present that's just a bit more special than cookies on a paper plate.
I'll have more cookie recipes soon, so get your jars ready!
Friday, December 2, 2011
Thursday, December 1, 2011
cookie #1: cardamom cookies
The first cookie recipe I'll share with you for Christmas is my favorite. Cardamom cookies. I make a lot of bar cookies for Christmas since they are so easy to make. My mom started making these at Christmas when I was young, and we make them every year together. They are buttery and crunchy, a bit spicy, and of course sweet! They become a new favorite to pretty much everyone who tastes them. Trust me. You'll need:
your mom
10 x 15 pan
parchment paper
1 cup butter, softened
1/2 cup sugar
1/2 cup packed brown sugar
1 egg
1 tsp vanilla or almond extract
2 cups all-purpose flour
1 rounded tsp cardamom
1/4 tsp salt
1/3 cup chopped nuts (we used walnuts)
for frosting:
1 1/2 T butter
1 cup powdered sugar
1/2 tsp vanilla extract
1 to 2 T milk
First, put your butter in a big bowl and soften it in the microwave.
Add your sugars to the softened butter.
Cream the butter and sugar with your mixer.
Now separate your egg, and keep your egg white in another little bowl for later.
Throw the yolk in your mixture.
Cream in your egg with the vanilla or almond extract. We're using almond here.
Be sure to have a helper nearby to hold the tablespoons. Extra points if she has a nutella beard.
Put your 2 cups of flour into another bowl and add your salt and cardamom.
Stir the flour mixture together.
Slowly add the flour mixture to the butter/sugar mixture while stirring or beating it together.
Spread the dough onto a pan lined with parchment paper. Use your hands to smooth and pat it down. If you use 3 year old hands, don't forget to wash them, or people won't eat your cookies.
Once it's all smoothed out, beat your egg white, and chop up your nuts if you didn't think ahead far enough to buy already chopped nuts.
Brush the dough with your beaten egg white.
Sprinkle on the nuts.
Bake at 275 degrees for an hour. While you're waiting for it to bake, feel free to give broom rides around the kitchen! No comments about your mother-in-law on a broom, Brian.
When your hour is almost up, start making the frosting. Melt the butter in a skillet.
You want your butter to get nice and brown.
Once it is brown, pour in the powdered sugar and stir.
Add in the vanilla extract, and add enough milk to bring the frosting to a drizzling consistency.
The cookies are finished when they are golden brown.
Pull them out and drizzle on the frosting.
Cut immediately, before it hardens too much.
Try not to eat the whole pan in one sitting.
Happy cookie baking! I have more cookie recipes to share this month- probably all bar cookies. And tomorrow I'll show you a great way to make a container to give away cookies as presents.
Wednesday, November 30, 2011
why i love pinterest: diy ruffled tree skirt
If you don't Pinterest, then you don't, uh, waste a whole lotta time. But while hours can slip by while I peruse the goodness of Pinterest, I sometimes actually MAKE something I pin! Which, if you are familiar with Pinterest, is a pretty awesome feeling. Since I like to take full advantage of when my parents come and visit, I thought my mom and I could knock out a tree skirt I've been eyeing for a while. Let me tell you, it was fun and pretty easy, especially if your mom helps. And it turned out just as pretty as the original tutorial.
If you want one of your own, you'll need:
3-4 yards fabric of your choice
4 1/2' x 4 1/2' square of canvas
glue gun
one thousand glue sticks
sharp scissors
rotary cutter
yard stick
pencil
I chose to make mine colorful and fun rather than try for elegant since it was going in the family room. These retro Santas really called to me. I also picked up a cream fabric with gold sparkles for alternate rows.
Start by cutting your fabric into 3 inch strips. Or around there. You can use scissors, but that might take you forever. You could also use your mom to rotary cut out the strips. (thanks, mom!)
We cut up 4 yards of fabric, but had a lot left over. So I would start with 2-3, and go from there.
Now grab your canvas. I used a painter's fabric dropcloth. Cut out your 4 1/2' x 4 1/2' square. Now fold into a fourth.
And now fold that over one more time.
Now you want to cut a small hole at the tip (for going around the trunk). I didn't get a shot of this, sorry. Not sure how that happened. And I was just going to cut a random curve at the bottom, but my mom got all fancy and mathy by using the yard stick and pencil to make a perfect circle.
She put the end of the yard stick at the point and put the pencil tip at one of the folded corners. Then she pushed the yard stick with her pencil, keeping her pencil tip at the same measurement on the yard stick, and leaving a mark, all while holding down the other end of the yard stick at the point.
If that didn't make sense, call my mom. Now cut along the line your mom just made for you. Don't ask me why I'm cutting like my thumb is in traction.
I also failed to get a picture of this, but you will need to cut an opening in your completed circle so you can actually put it around the base of the tree. Unless you are planning on using it around a Festivus pole. In which case you could just slide it on over. Anyway, cut a straight line from your center hole all the way to the edge. Now break out your glue gun and get ruffling! Starting at the bottom of the skirt, make about a 6 inch line of glue, and then lay your fabric strips on top, pinching as you go. You want to be pinching on top of your line of glue.
Go all the way around, leaving a bit of an edge to tuck over the end and glue down.
Now if you are using alternating fabrics, grab your other strips and start at the begining, a couple inches above your last row.
This was about the time mom abandoned me to help Fletcher make a tree skirt for his little tree. No ruffles with his, just a lot of cars and felt balls.
Keep on ruffling until you reach your trunk hole. Once I had my last little row put on, I glued under the canvas at the top to keep it from fraying. On the original tutorial, they had you also glue on ribbon so you could tie it. I didn't feel it was necessary, so I skipped it. But go right ahead if you really want to glue some more!
I think it turned out pretty cute.
Be sure to by the glue sticks in bulk. You'll go through a lot. Be patient about the ruffling- it can take a bit to get into the swing of it. You may also lose a few fingerprints if you aren't careful. But hey, that might come in handy, right?
If you want one of your own, you'll need:
3-4 yards fabric of your choice
4 1/2' x 4 1/2' square of canvas
glue gun
one thousand glue sticks
sharp scissors
rotary cutter
yard stick
pencil
I chose to make mine colorful and fun rather than try for elegant since it was going in the family room. These retro Santas really called to me. I also picked up a cream fabric with gold sparkles for alternate rows.
Start by cutting your fabric into 3 inch strips. Or around there. You can use scissors, but that might take you forever. You could also use your mom to rotary cut out the strips. (thanks, mom!)
We cut up 4 yards of fabric, but had a lot left over. So I would start with 2-3, and go from there.
Now grab your canvas. I used a painter's fabric dropcloth. Cut out your 4 1/2' x 4 1/2' square. Now fold into a fourth.
And now fold that over one more time.
Now you want to cut a small hole at the tip (for going around the trunk). I didn't get a shot of this, sorry. Not sure how that happened. And I was just going to cut a random curve at the bottom, but my mom got all fancy and mathy by using the yard stick and pencil to make a perfect circle.
She put the end of the yard stick at the point and put the pencil tip at one of the folded corners. Then she pushed the yard stick with her pencil, keeping her pencil tip at the same measurement on the yard stick, and leaving a mark, all while holding down the other end of the yard stick at the point.
If that didn't make sense, call my mom. Now cut along the line your mom just made for you. Don't ask me why I'm cutting like my thumb is in traction.
I also failed to get a picture of this, but you will need to cut an opening in your completed circle so you can actually put it around the base of the tree. Unless you are planning on using it around a Festivus pole. In which case you could just slide it on over. Anyway, cut a straight line from your center hole all the way to the edge. Now break out your glue gun and get ruffling! Starting at the bottom of the skirt, make about a 6 inch line of glue, and then lay your fabric strips on top, pinching as you go. You want to be pinching on top of your line of glue.
Go all the way around, leaving a bit of an edge to tuck over the end and glue down.
Now if you are using alternating fabrics, grab your other strips and start at the begining, a couple inches above your last row.
This was about the time mom abandoned me to help Fletcher make a tree skirt for his little tree. No ruffles with his, just a lot of cars and felt balls.
Keep on ruffling until you reach your trunk hole. Once I had my last little row put on, I glued under the canvas at the top to keep it from fraying. On the original tutorial, they had you also glue on ribbon so you could tie it. I didn't feel it was necessary, so I skipped it. But go right ahead if you really want to glue some more!
I think it turned out pretty cute.
Be sure to by the glue sticks in bulk. You'll go through a lot. Be patient about the ruffling- it can take a bit to get into the swing of it. You may also lose a few fingerprints if you aren't careful. But hey, that might come in handy, right?
Tuesday, November 29, 2011
ihf- bust a gut
I didn't have a picture in mind until I snapped this shot tonight while Brian and Rowan were playing. She loves the horsing around with her Papa. I love watching them!
I'm slipping it in under the wire, but if you want to see more happy laughing faces, check out i heart faces!
Labels:
brian,
fun,
i heart faces,
rowan
Subscribe to:
Posts (Atom)