I like to give my neighbors cookies and treats at Christmas, and usually I go buy little bags or boxes to use. But this year I tried to think of something I might have around the house besides paper plates, and I realized I just needed to start saving peanut butter jars, coffee containers, and formula tubs. I have a whole stack of them in my pantry to pretty up for giving away cookies this year. I did this one from a large peanut butter jar.
You'll need:
container of your choice with a lid
burlap
ribbon
sharp scissors
glue
Christmas paper
embroidery needle
ruler
tape measure
Start with a cleaned out container. If you use a coffee container, soak it for a while with a water/baking soda solution to rid it of the coffee smell/flavor. You could definitely use glass jars for this, too, like from salsa or pickles. Or if you don't know what to do with your 25 mason jars in your basement.
First, measure your jar from the middle of the bottom to just beyond the top of the lid. Here's my mom, helping out again.
My jar was 8 1/2 inches, so I wanted a 17" x 17" square of fabric. Measure and cut your square out.
You don't need to be super exact here. The charm lies in the rusticness of this project.
Now you'll want to cut the corners off of your square and do a rough circle shape.
Glue the bottom of your jar to the center of the burlap circle. I put wax paper underneath since burlap is very porous. And then you can peel off the wax paper after the glue is dry.
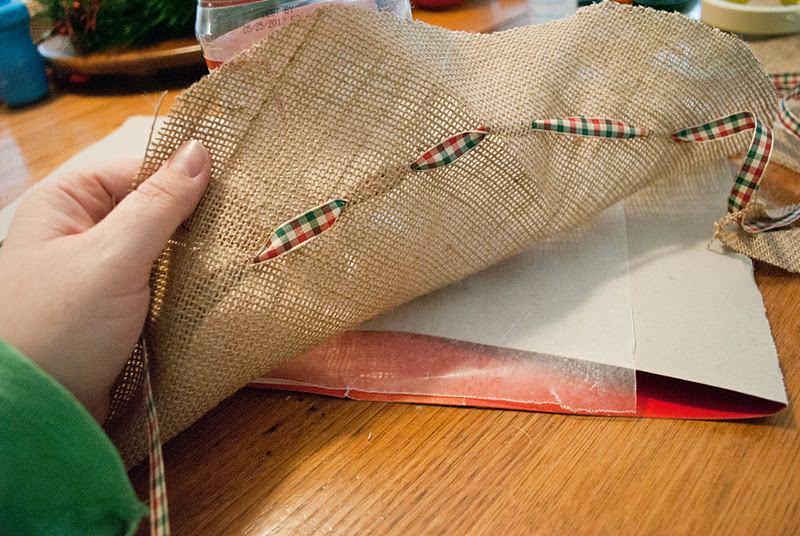
Press firmly and let it dry a few minutes. Now grab your embroidery needle and thread your ribbon through.
Sew around the edge of the circle, about 2 inches in. This ribbon will gather in at the neck of your bottle, so you may want to check how far in you want to be before you start. I didn't do an exact measurement, I just held it up for an idea of where it should be. I varied my stitch length so that the gathers weren't uniform. Feel free to be more precise if you feel compelled.
You can see above just how un-precise I can be. Now pull your ribbon through so that you have 2 tails coming out right next to each other.
Start pulling the ribbon tails so that the burlap starts to gather.
Pull as tightly as possible, and then tie a tight knot.
You can tie a bow here if you like what you see, but I wanted more ribbon showing overall, so I doubled the ribbon back over the stitched ribbon and tie a bow.
Now take off the lid, and find some pretty paper. You could also use wrapping paper.
Trace a circle around your lid.
Since my lid was red, I cut the circle to fit slightly inside. But you can cover the entire lid, and also use a ribbon around the edge if you don't like your lid. You can write a message on the lid, or stick on a To: From: label. Use glue to attach your paper circle to the lid.
Now fill up your jar with treats!
And now you have a pretty little present that's just a bit more special than cookies on a paper plate.
I'll have more cookie recipes soon, so get your jars ready!


This is SO COOL!!!!!!! I will definitely be saving my PB jars next year!!! Thank you for sharing! :)
ReplyDeleteThis is genius. :) I have a tight budget this year, so most of my friends and family will be getting baked goods for the winter holidays, rather than actual gifts. However, I didn't want to gift them in something like a plastic bag, so this will work perfectly. :) Unfortunately, I have a problem with procrastinating, so I'll probably just have to buy some jars and decorate them. Either way, it saves me money and I can customize it for everyone. :)
ReplyDelete